Wednesday, December 17, 2008

Harvesting Your Compost

Depends on your worm bin setup and medium to worm ratio ( density ) , you may do the harvesting every 1 to 2 month for a healthy worm supply and a good mixture of castings and vermicompost. Some wonder why actually I’m differentiating casting and vermicompost ? What is the different ? I will explain this in detail in a short while.

When you are ready to harvest, you will notice that the volume of material has dropped substantially and the original bedding is no longer recognizable. The contents will now be brown and earthy-looking. There are several ways to harvest:

1. Move the contents of the bin over to one side. Add fresh bedding or medium to the vacant side. Put food waste in the new bedding. The red wigglers will gradually move over in search of food. After one or two weeks the finished compost can be removed.

2. Prepare new bedding. Dump the contents of the bin onto a large plastic sheet, and separate into small cone-shaped piles. Place a bright light above the piles. The worms
will move down away from the light. Remove the compost from the top. Repeat this four
or five times until a small pile of worms and compost remain. Place the worms and
the compost in the bin with fresh bedding.

3. Remove the entire contents of the bin. Put in fresh bedding and food. Place a large piece of damp burlap or the onion bag over the bin ensuring that the burlap / onion bag overhangs the edges of the bin and slightly touch the new bedding . Place one inch of vermicompost on top of the burlap / onion bag. With a bright light over the bin, the worms will move through the layer of burlap / onion bag and dive onto the newly prepared bedding, and you can remove the finished compost.


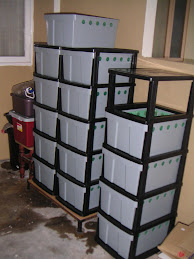
Note: For the second and third methods, don't feed the worms for one or two weeks prior to harvesting. If you do in bigger scale, a commercially available worm harvester will be a better approach.

This methods are not suitable to segregate the cocoons out from the castings ( if you interested on increasing the worm amount ) , you can use a small wire mesh ( as picture shown below ) to filter out the cocoons and can obtain a finer castings for selling. You can put back the bigger size castings together with the cocoons onto you newly prepared beddings for increasing your worm population. But beware , to much worms in a same bin ( density ) may caused the worms to race for food and indirectly reducing the reproduction rate.


Come back to the difference between casting and vernicompost. I tend to use the terms ‘worm castings’ and ‘vermicompost’ interchangeably here on the blog, when technically speaking they are not quite the same thing.

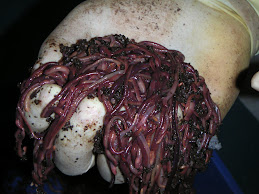
Worm castings are literally little worm poops - that is to say, material that has gone in one end of the worm and out the other. If you have 100% pure worm castings (virtually impossible to achieve) you should have a material that looks a lot like coffee grounds.

Vermicompost is really a more accurate term when it comes to the material produced in most worm composting systems. It is basically a mixture of worm castings, partially composted wastes, and any resistant materials that won’t readily break down. Really high quality vermicompost should have a high percentage of worm castings in it, but the chances of having every last bit of material in your system pass through a worm at least once is pretty slim.

Anyway - definitely not trying to split hairs here - just thought some of you might be curious about the technical difference between these two terms!

Sunday, December 14, 2008

Reproduction of your worm.

Under ideal conditions your worms can double in volume every 90 days. The average incubation period for our worms is between 30 and 80 days, depending on environmental conditions. Once the new worms hatch, it'll take them 8 to 10 weeks to become sexually mature and begin producing cocoons...and the cycle continues, on and on. Your poundage should double every 3 to 4 months, as long as they have adequate space, food, moisture, and bin temperatures.


A sexually mature worm will always be 'banded'(see the mature/immature photo at bottom of page),the ring, or band on the mature worm is called the clitellum. When two worms mate, they each go off and deposit egg capsules. Each capsule will contain one to 20 young, but the average survival rate is between three and four per capsule. The newly deposited egg will look like a small lemon, and be pale in color; as the blood supply increases, the color will deepen, and can be nearly black before hatching.


Reproduction Rates By Species
( According to Ms.Kelly Slocum..... )

Following are the maximum reproductive rates of a few worm species under ideal conditions, and their environmental requirements:

Eisenia fetida (foetida)/Eisenia andrei Common names: redworm, tiger worm, manure worm

Maximum reproduction under ideal condtions:
3.8 cocoons per adult per week
83.2% hatching success rate
3.3 hatchlings per cocoon
Net reproduction of 10.4 young per adult per week

Maximum growth rate under ideal conditions:
32-73 days to cocoon hatch
53-76 days to sexual maturity
85-149 days from egg to maturity

Heat tolerance is dependant on moisture level E. fetida is extremely tolerant of environmental fluctuation and handling and is the species identified by research as the most effective for vermicomposting in the widest range of feedstock’s and environments.

Perionyx excavatus , Common names: blue worm, Indian blue, Malaysian blue, Spike tail.

Maximum reproduction under ideal conditions:
19.5 cocoons per adult per week
90.7% hatching success rate
1.1 hatchlings per cocoon
Net reproduction of 19.4 young per adult per week

Maximum growth rate under ideal conditions:
16-21 days to cocoon hatch
29-55 days to sexual maturity
45-76 days from egg to maturity

Heat tolerance is dependant on moisture level P. excavatus cannot tolerate cold temps for even brief periods of time and does not tolerate environmental fluctuation or handling. It is most frequently used in tropical regions where it is naturalized and is found naturally only in areas along the gulf coast of the US. If used in most areas of north America this worm requires temperature controlled environments.

Eudrilus eugeniae , Common names: African night crawler, giant night crawler

Maximum reproduction under ideal conditions:
3.6 cocoons per adult per week
81% hatching success rate
2.3 hatchlings per cocoon
Net reproduction of 6.7 young per adult per week

Maximum growth rate under ideal conditions:
13-27 days to cocoon hatch
32-95 days to sexual maturity
43-122 days from egg to maturity


Heat tolerance is dependant on moisture level. This worm species is a very large worm that is often grown for bait. It requires a temperature controlled environment in most areas of north America as it cannot tolerate cold for even brief periods and does not tolerate handling.

Eisenia hortensis (Dendrobaena veneta) , Common names: Belgian night crawler, European night crawler

Maximum reproduction under ideal conditions:
1.6 cocoons per adult per week
81.2% hatching success rate
1.1 hatchlings per cocoon
Net reproduction of 1.4 young per adult per week

Maximum growth rate under ideal conditions:
40-128 days to cocoon hatch
57-86 days to sexual maturity
97-214 days from egg to maturity

Heat tolerance is dependant on moisture level. This worm is very tolerant of environmental fluctuation and handling, but has a slower reproductive rate and requires very high moisture levels, relative to other worm species.

Source :- http://www.bonterra.net/ , photos by :- Amy Weishuhn

Wednesday, December 10, 2008

Start up your own worm rearing ( Vermiculture )

There are few request to put up a rough estimation on the start up cost and the return from doing this business. Here , I will provide a simple , yet useful calculation for you to consider to start-up the vermiculture business. Remember , this is just a guideline for you and the actual cost may varies from place to place , time to time.

Let me put in this way , say you plan to start up the vermiculture with initial investment of 1kg of Eisenia Fetida ( Red worm ). I will extend the calculation up to a year , just to show you the potential return on your investment and the ROI ( Return on Investment ) for that particular year.

You will be amazed after seeing the $$ !!!

Initial investment ( 1kg ) of Red Worm = $ 450.00
Holding Bin ( Toyogo set / 5 drawer ) = $ 70.00
Spray bottle ( pump type ) = $ 16.00
Rain water = Free la !!
Medium = $1.00 / kg ( you need at least 20 kg ) = $ 20.00
Worm filter ( Harvesting ) = $ 3.50

Total initial investment = $ 560


Assume , growth rate of your worm is 25% monthly , in 12 month time you will have almost 12 kg of crawling red worm in your posses , ha ha ha --- ( Evil laugh ) :D

Ok , back to business , with a harvesting yield of 75% , your may have your ROI after 4 months, and after that it will be a passive income from your business ! You may have choice of increasing your worm amount to make more $$ , or you may choose to retain the 12kg of worm , and sell the excess worm back to the shop were you initially bought the worm from. Usual re-sale worm price within $80 to $ 100 per kg.

With 12 kg already in your posses and with 25% reproduction rate monthly, you may get 3kg of worm to re-sell every month and there is another $300 flow in on top of your $700 sales of your vermicompost !!!

Is this a lucrative business or what !?

(All the calculation shown above is illustrated based on ideal cases, detail study need to be done before start your business , there are some other expanses that not shown on the above calculation , ex. worm container , packing plastic and labels and some marketing cost were also involve )

Monday, December 8, 2008

Worm Anatomy

A worms body is made up of many segments called 'annuli'. The length of a worms body has muscles which contract and relax which enables the worm to move along a surface. The 'annuli' are covered in tiny hairs called 'setae' which help the worms movement.

Worms have no lungs, so they do not breathe like a human being or like many other animals. Instead, because they do need oxygen, they absorb the air through tiny pores in the skin and it goes straight into their bloodstream. A worms skin must stay wet so the absorbing can take place, that is why they have a constant slimy look. However, if they have too much water, they can drown.

Worms also have no eyes, ears or nose so they cannot see, hear or smell. Worms do however, have light-detecting cells on their bodies that can detect harmful light conditions. The ultra-violet rays of the sun are harmful to worms - they can even kill them, that is why worms spend most of their time underneath the surface of the ground. A worm is also very sensitive to movement and can sense rain approaching and other creatures who might be a danger to them.

Believe it or not, a worm has actually got five hearts. Five hearts that pump blood around its' body. On the right, you will see how a worm looks inside. You can see the five hearts lined up down the centre of the worms insides, just below the oesophagus.


There is a common myth that has been around for a long time now that if you cut a worm in half, the two halves will grow into worms - making 2 worms out of 1. This is very untrue. It is true that if a worm loses part of its body it will survive, but if you cut a worm into 2 pieces, one half will surely die. The half with the saddle (the fatter, pink part) will burrow itself into the soil and survive. It is not a good idea to cut worms in half or any other creature for that matter - it is very cruel - so please do not be taken in by this myth and leave the worms whole.

Source :- www.animalcorner.co.uk

Tuesday, December 2, 2008

Types of compost worm.

Earthworms are scientifically classified as animals belonging to the order Oligochaeta, class Chaetopoda, phylum Annelida. In this phylum there are about 1,800 species of earthworms grouped into five families and distributed all over the world. The most common worms in North America, Europe, and Western Asia belong to the family Lumbricidae, which has about 220 species. Earthworms range from a few millimeters long to over 3 feet, but most common species are a few inches in length. Only a few types are of interest to the commercial earthworm grower, and of these only two are raised on a large-scale commercial basis.

1. Eisenia Fetida ( Red worm ) - Types of Earth worm used for composting :- Common names for the Eisenia fetida are: Redworm, Red Wiggler, Tiger Worm, Manure Worm, Stink Worm, Fish Worm, Dung Worm, Fecal Worm, Striped Worm, as well as many other names. In Texas they use the term angleworms & bandlings for Eisenia fetida red worms, but angleworm is also a common name for the larger earthworm species such as the Canadian Nightcrawler in northern regions. That is why using the scientific names for worms is less confusing! Eisenia fetida are recognized by their alternating red and buff stripes, thus the common name "Tiger Worm". The Eisenia fetida is an Epigeic worm. Epigeic worms live on the surface of the soil or in the top 10 inches or so of the topsoil under the litter layer.


2. Dendrobaena Veneta ( European Night crawler ) or Eudrilus Eugeniae ( African Night crawler ) - This earthworm is common to the northern states and may be picked from fields and lawns at night for commercial fish-bait sale. Although very popular with fishermen, they are not commonly raised on a commercial basis because they reproduce slowly and require special production and control procedures.


3. Perionyx Excavatus ( Indian Blue worm ) - A noticeable characteristic of this species is the iridescent purple along its body. It's a fast mover and very vigorous! Common names are Blue Worm, Indian Blue, Malaysian Blue, Spike Tail. P. excavatus cannot tolerate cold temps for even brief periods of time and does not tolerate environmental fluctuation or handling. It is most frequently used in tropical regions where it is naturalized and is found naturally only in areas along the gulf coast of the US.


Manure worms and red worms can adapt to living in many different environments. They will eat almost any organic matter at some stage of decomposition, as well as many other types of materials which contain organic substances that can be ingested. These worms may be found in manure piles or in soils containing large quantities of organic matter, but the new grower should purchase breeding stock from a reputable grower or distributor.

Source :- www.allthingsorganic.com , www.wikipedia.com

What is a medium ?

A medium is the home of our cacing , which eventually also its food source. Prepare a good medium will make sure the cacing feels good and start to do their job effectively. If there's any problem in the medium we prepare , it may cause the cacing not to feel comfort and will try to climb out from the medium or die.

Few type of medium we can prepare :-

1) Mixture of saw dust ( serbuk papan ) & Goat/Cow Manure ( Tahi Kambing / Lembu )
2) Mixture of shredded newspaper (no color / plastic coating ) & Goat/Cow Manure
3) Mixture of dry leaves/grass/"lalang" & Vegetables ( no onion , ginger , garlic )
4) Mixture of coco peat ( serbuk sabut kelapa ) & Goat/Cow Manure

* Note :- all the above item must be soaked in water for fermentation process before making the medium.


Actually for medium preparation there’s no limitation , if you have access on any one of the above item , you may freely used it for medium making , must beware no chemical mixture ( racun serangga / ubat cacing ) on any of the medium ingredient.
The mixture of medium must be in the ration of 70:30, or known as the C:N ratio among worm breeders’. The C stands for Carbon and the N is stand for Nitrogen. This 2 components is essential on compost making.
The process of medium making , can be said long and difficult process , thus , the best choice is to buy the medium , 1kg of medium is sold between Rm 1.00 to Rm 1.40 , depends on the location.


How to prepare a Worm Bin.

There a lot of method on preparing a worm bin , the worm bin can be made from wooden plywood , plastic bin , iron drum , or even from brick ( nicely arrange to form a box ). The depth of your worm bin is the most important factor , it should around 12 to 18 “ in depth , this is to make sure the medium always in aerobic condition ( kaththotam ) , because the cacing breath thru their skin , proper medium condition is needed , not to dry or to wet. The best way to check the medium condition is to hold a quantity on your hand and squeeze the medium , when you release , if the medium tend to break into pieces than its to dry , if to much water spills out , too wet. The best medium condition is to have 1 or 2 drops of water when you squeeze it.

Photo below is the sample on how to make a ideal worm bin :-


What is Vermicompost ?

Vermicompost (also called worm compost ( “tahi cacing”) , is the end-product of the breakdown of organic matter by some species of earthworm. Vermicompost is literally the best nutrient-rich, organic fertilizer and soil conditioner. The process of producing vermicompost is called vermicomposting.


The earthworm species (or composting worms) most often used are Red Wigglers (Eisenia foetida). These species are commonly found in organic rich soils throughout Europe and North America and especially prefer the special conditions in rotting vegetation, compost and manure piles. But in Malaysia , red worm are not available in natural habitat , you must either buy it from any agrotech , or worm rearing shops. Current price for 1 kilo of red worm is between RM250 to RM450.

How does vermicomposting work?

It works like this: after procuring a container and setting it up feed your worms the same organic waste you'd toss in a compost pile -- which includes just about all of your food waste, save the animal leftovers -- and let them have at it. They chew on it for awhile, and when they're all done eating, they poop and there you go: vermicompost.


Benefit

In addition to increased nutrient levels, worm castings contain millions of microbes which help break down nutrients already present in the soil into plant available forms. As the worms deposit their castings, their mucous is a beneficial component absent from compost produced by hot or cold composting. The mucous component slows the release of nutrients preventing them from washing away with the first watering. Worm compost is usually too rich for use alone as a seed starter. It is useful as a top dressing and as an addition to potting mixes at a rate of one part castings to 4 parts mix. Your plants will love it.